


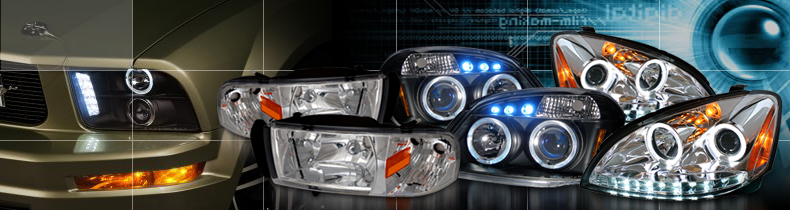
Halo Headlights, Projector Head Lights, LED Head Lamps, Angel Eyes Headlamps at TunersDepot.com
Welcome to the Projector Headlights superstore at TunersDepot.com. We have huge selection of projector headlights with all the options you want. Our store is fully loaded with halo projector headlights, LED projector headlights, angel eye projector lights. If you are looking for halo head lamps, projector headlamps or other replacement headlights, you have come to the right place! At TunersDepot.com, we offer the most and the newest projector lights for a wide range of car models. TunersDepot is the ultimate shopping destination for your replacement head lights needs!
We carry different brands of our projector headlights line, such as KS projector lights, KS CCFL halo head lights, KS CCFL projector headlamps, Sonar projector head lights, Sonar halo lights, Sonar LED projector lights, TM projector head lamps, TM LED Halo Lights, TM LED Projector head lamps, TD crystal headlights, TD LED crystal headlights, TD crystal head lamps.
At TunersDepot.com, you can also find many projector headlamps with different options to choose, there is black housing projector lights, chrome housing projector head lamps, dual halo projector lamps, single halo projector headlights, blue lens projector head lights, clear lens projector head lights. Black housing replacement headlights have became more popular in the market because the factory headlights are usually made with chrome housing and you can see immediately see the difference in the appearance after the installation.
How do I install a set of headlights?
Installing aftermarket headlights can be a little tricky sometimes, since some cars and trucks require you to unbolt part or all of the front bumper. If you are willing to put in the elbow grease, and are familiar with changing out the parts on your car or truck, you could save big bucks over going to an installer.
For halo headlights (and in some cases LED headlights), there is an additional step required if you want the halo function activated. Since the halo is left unwired, you have to decide where to install it to (when you want it to turn on) and splice it to that function.
Is it hard to install headlights onto my vehicle?
That depends. Straight up installing-onto-the-vehicle-wise, for 95% of headlights it's just a matter of unbolting and re-bolting parts. Easy vehicles could just have 3 easy to get to bolts per headlight, while difficult installations may require you to deal with 20 plus bolts and require you to completely uninstall the front bumper and grill to take off just one headlight.
A good way to tell how many bolts you have to deal with is to look at the new lights and see how many bolt on points they have, and discern where they are located. The bolts on top of your headlights are usually easy to get to on most vehicles, but the bolts on the bottom and towards the grill might be more challenging. Compare the bolts on the bottom of the new headlights with your current headlights. Can you see the installation point, or is it covered by the bumper? How many plastic tabs are holding in your bumper? Do you see any special bolts or screws such as torx bolts? These are the questions that will help you to decide whether or not the installation is too difficult or not.
For the halo / LED portion of some installs, electrical splicing is required. This consists of taking the bare ends of the wires , determining which is positive and which is negative and then connecting them to (in a standard installation) the appropriate positive and negative parking light wires. Regarding determination of positive and negative, it's not terribly big deal since you can just try one way and if it doesn't work, it's for sure the other way. Also, rather than cutting joining and using electrical tape, you can buy splicers at your local auto parts or electrical store that make it a simple clip on installation since the splicers automatically bite into the wires and seal the connection simultaneously.
Tools generally needed to install headlights
- A full socket wrench set
- Clean gloves to handle the bulbs
- Painters tape to prevent scratches to your vehicle
- (Rare) Screw drivers, torque wrenches, etc.
- (For LEDs / Halos) 2 splicers per Halo / LED array
General headlight installation procedure
- Inspect the new set of headlights to make sure you can complete the installation with the tools you have available.
- For safety, disconnect your car battery's negative battery terminal. If your stereo requires a key code in order to reboot, please be sure you have it before disconnecting the battery. Also, be aware that you will probably have to reset your clocks etc after reconnecting the battery later.
- Park on a level surface facing a wall that you could shine your lights on later to aim your headlights.
- Apply painters tape along the edges of your bumper and grill along the headlights to prevent any scratches that might occur while removing and installing headlights. If uninstalling your front bumper is required, make sure you have a safe surface to place the bumper on and that the working surface below the vehicle is also safe in the event the bumper falls down.
- Without touching the glass, uninstall the stock headlight, parking, and signal bulbs (as applicable). Depending on the bulb type, this is usually done by just turning the bulb a quarter turn counter clockwise and pulling back. Some vehicles (especially European vehicles) require a few extra steps, such as unclipping a retaining wire or removing a plate that holds the bulb in. Once the bulb is removed, place them in their original container (if available). If they are cold, you could also store them in a ziplock type of bag.
- Unbolt the bolts on the headlight with a socket wrench. Check the new headlights to help locate the installation points on the old headlights.in almost all cases the bolt locations will be exactly the same.
- Install the new head lights and bolt in place.
- For crystal headlights, reinstall the old bulbs into the new headlights. For projector head lights, install the end of the male bulb wire plugs on the projectors to your vehicles stock harness. Reinstall the parking and signal light bulbs as applicable.
- For halos, splice the negative wire to your vehicles parking lights negative wire and repeat with the positive wire.
- Reconnect your battery and turn on your headlights and adjust until they are both level with the vehicle. The adjusters usually consist of gear looking mechanisms on the back or top of the headlight that are turned via a centrally placed screw and are usually.
- Reconnect all connections and tighten all bolts in place.
Headlights FAQ (Frequently Asked Questions)
Are your head lights sold by the piece or the pair?
All of our headlights are sold in the full pair. When you pay the listed price, you are receiving the complete set including the right and the left sides.Are these headlights street legal?
To our knowledge, all of the Sonar (aka Spyder) and KS (aka Anzo) brand headlights we sell are street legal as mandated by federal law in the United States. That means basically that they are designed to the specifications set forth by the DOT (United States Department of Transportation). On occasion, DOT may test models to double check for compliance. In cases where these headlights fail (rare) DOT will have the companies issue a recall. For such headlights, we can take them back and refund you. For other brands, we can not guarantee DOT compliance. Also, please be advised that you may have local laws that may disallow these sorts of headlights to be used.Will these head lights make my car brighter?
No, unless your old headlights are so dirty and yellowed that you could barely see out of them, new headlights will not make your light beam any brighter. While projector headlights can change the way light is spread out over the road (wider area), they will not increase overall brightness. The only way to increase brightness is to upgrade to higher wattage bulbs or to install a set of Xenon HID system.How can I prevent my headlights from fogging up or letting moisture inside?
During the first few days of operation, it is normal to see some moisture appear in your headlights. This is due to the small amounts of moisture in the plastic and coating that are evaporated when the headlights are first warmed up during use. This sort of moisture is normal and should disappear within a few days.To be sure that no external moisture gets into the headlight though, it is a prudent idea to silicone seal the edges. Clear silicone sealant can be found in any hardware store (and some auto part stores), and can be applied to the seam along the headlights where the clear lens meets the rear housing. The $5-$10 is worth it in the long run to protect your investment.
Also, even if a bulb has died, make sure to keep it installed in the headlight until you replace it to prevent moisture from entering through the bulb hole.
Can I install Xenon HIDs with these head lights?
This depends. Most headlights have the physical space to install HID bulbs, but even if it fits, you should ONLY USE LOW WATTAGE HID kits. Wattages higher than 35w can create too much heat which may end up damaging the headlight. Also, please be advised that most projector headlights convert your stock bulbs to a different type. Thus, you need to buy the appropriate bulb for the specific projector bulb you are using, usually an H1, H3, H7, or 9006.While installing the Halos or LEDs, how can I tell which wire is positive and which wire is negative?
Generally speaking, black is always going to be negative. If there are two reds, then you can use either or. If you still can not tell, you can use an electrical tester. It's probably faster to just try it though since you have a 50% chance of getting it right, and if it's wrong you automatically know it's the other way.On the parking light wires, black is almost always going to be negative. In cases where the parking light serves as a signal light as well, the solid color wire will be the positive parking light wire since the striped wire usually is for signaling function.
Can I install my halos to another light such as my signal lights?
Theoretically you can, but we highly recommend against doing so as it will void the warranty on the headlights. This is due to the fact that the constant flashing of the halo leads its life to be decreased dramatically. If you are unable to wire the halos to your parking lights, we recommend wiring them to your low beams or installing a separate switch.